Thursday, July 14, 2011

Butterfly, Finch & Chipmunk Pencil Paintings

I thought it was about time I posted my most recent artwork up on here. I have been tied up getting things ready for fairs and festivals but have finally found time for a bit of blogging. I will really try and make time from now on. So here are my 3 most recent pieces of color pencil artwork ~ Monarch Butterfly & Echinacea, Goldfinch & Thistle and Chipmunk & Apple Blossom.....

Monarch Butterfly & Echinacea
Goldfinch & Thistle
Chipmunk & Apple Blossom

........ All 3 pieces are available as archival prints (matted and non-matted) and note cards from my website www.taratiberiofineart.com :)

Monday, June 13, 2011

Naples Festival and a few portraits in progress...

Booth at Naples Festival


I had a blast at the Naples Festival. The weather was perfect, not too hot and not too cold. However it was the first nice day we had had for a long time so perhaps everyone was out doing their gardening because it was very very quiet at the festival. Saying that, I did make a few sales and a few new friends. I am also going to have some of my work for sale in a couple of stores in the area. Right now I am focussing on completing a few more color portraits in time for the Corn Hill Festival which is happening on July 9th and 10th. I am going to be patient and wait for the final scans of the originals before I post the completed portraits :)

Butterfly Pencil Portrait

Goldfinch Pencil Portrait

Sunday, May 15, 2011

Golden Retriever Color Pencil Drawing ~ Finished

Golden Retriever Color Portrait
I have finally got a round to completing the golden retriever color pencil drawing that I started quite some time ago. I put the drawing away for a while as I was in the process of moving house and tied up with other commitments. I spent roughly 25 hours on this portrait. I could have spent many more hours on it but luckily I have a husband who helps me decide when enough is enough :)

I will be showing some of my original artwork and prints at the Naples Spring Artisan Showcase next weekend May 21st & May 22nd.

Wednesday, April 6, 2011

Golden Retriever Color Pencil Portrait in Progress

Golden Retriever Portrait with 2-3 layers of color pencil
It has taken roughly 12 hours to get to the stage where most of the portrait has at least 2-3 layers of color pencils applied over it. I have given the eyes and nose more attention because once I have these areas correctly proportioned and shaded (on any portrait) I find myself eager to carry on drawing. From here I expect to spend at least another 10 hours working on defining the hair before I add even more detail to the eyes and nose. 

Golden Retriever Pencil Portrait with one blended layer of color pencils

I found a beautiful photograph of a dopey looking golden retriever in the reference image library on the Wet Canvas website (I believe the photograph was taken by the User called Sheevuh), and I thought it would be perfect for my next color pencil portrait. Six hours after starting and this is how my Golden Retriever pencil painting looked with just one layer of color pencil. Once the entire portrait area (9.5 x 7.5 inches) had a layer of color pencil I then blended the colors using a Prismacolor white pencil. Using a white pencil to blend washes out nearly all the color and seems like a waste of time, but actually this process makes layering pencils easier from this point on due to an even layer of wax over the paper.

Friday, March 25, 2011

"Jenga" ~ Finished Portrait

'Jenga' Cat Color Pencil Painting
After many many hours I have decided that the portrait of Jenga is now complete. I thought I had reached this point some time ago so I put the portrait up on the wall and put my pencils away. A few days later I decided I wasn't happy with the portrait so I got the pencils out again and some 20 hours later finally reached a point where I was completely satisfied. I made changes to almost every part of the drawing including the eye and nose, and went over the entire hair! I think the part that changed the least were the whiskers (minus the one individual whisker I removed). All in all I think I spent over 40 hours on this small drawing (8" x 6.5"). This is a bit extreme but it is only my second attempt at a color pencil portrait and I know l have a lot more to learn about the process. Prints and cards of Jenga will be available from my website very soon.

Thursday, March 24, 2011

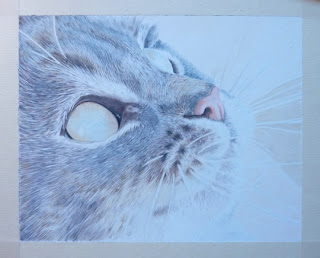
"Jenga" ~ Portrait in Progress

"Jenga" Whiskers and background
The fur now has many many layers of pencil as I tried to create depth using shadows and highlights. For the whiskers I tried to leave the white paper showing through as even the white pencils I had looked a shade a gray compared to this. For the background I used a shade of brown and filled in the areas between the whiskers. First I applied one light layer to the background to make sure I was happy with the position of the whiskers. Once happy I applied more layers using different colors to prevent the background from looking flat.
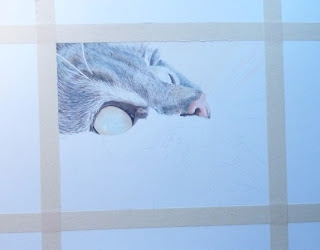
"Jenga" Making a start on the fur, skin and nose
Once I had the outline down I started to work on the fur in the top left corner. Being right-handed this makes sure I work from left to right and prevents me from smudging the pencil I put down. This is only my second color pencil drawing and at this point I was still getting used to the colors and how they worked together. I used nearly all the grays and browns for the fur and always applied them in the direction of hair growth. The skin a round the eye in very dark and almost black in some areas, however I never use my darkest pencil until the very end, when I am completely happy with the overall drawing. For the skin a round the eye and the nose I applied the pencils in small circular motions.
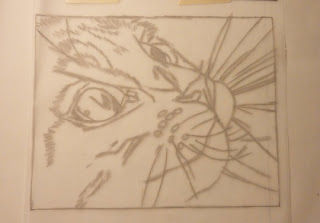
"Jenga" Outline transferred onto tracing paper
I decided to try a new method of getting the outline onto paper. When I am drawing with graphite pencil I usually draw a grid onto the paper and scale the image up to the size I want. However I didn't want to use a graphite pencil on this piece because it would 'dirty' the color pencil I use on the drawing later. Also, with color pencil being more difficult to erase I didn't want to draw a grid at all. Instead I printed the image and transferred the outline onto tracing pencil using a sharp graphite pencil. I then turned the tracing paper over and on the opposite side applied color pencil directly on top of the outline. Once I was sure I had enough color pencil down I turned the tracing paper over to the original side and positioned it onto a new sheet of bristol white paper. To be sure both pieces of paper wouldn't move I secured them to the drawing board with drafting tape. Using my sharp graphite pencil I went over the outline applying more pressure than usual and this transferred the color pencil on the opposite side onto the white paper beneath. The image above is of the tracing paper with both the graphite pencil outline and the color pencil shading visible.

Thursday, March 3, 2011

My very first colored pencil drawing

Duckling colored pencil drawing
So here it is, my very first colored pencil drawing! It started out as an experiment, something small (8 x 6.5 inch) just to try different techniques and to get used to the colors. I told myself at the start not to get too carried away, that it was just my first drawing and not to expect too much at the end.

Anyway, with me being me the perfectionist soon came out and I couldn't help but try and get everything just right. Unfortunately I didn't clock the time spent on the drawing but I'm just going to say it took many many hours!! I reached many points where I was ready to give up, but I am so glad I persevered. I love the final outcome and I couldn't wait to post it on here : )